Crochet Water Bottle Holder Free pattern for Eco-Friendly Living
Keep water bottles close with Free Crochet Water Bottle Holder Pattern featuring practical style and simple comfort for walks and outings.
Carrying a water bottle can sometimes be awkward and uncomfortable. It takes both hands or leaves you juggling when your hands are full. Having a handy holder makes staying hydrated easier and more stylish. A crochet water bottle holder pattern offers a simple way to make your own cozy carrier that fits your bottle perfectly.
This holder keeps your bottle close and easy to reach whether you are walking, biking, or running errands. The crochet fabric gently protects the bottle and adds grip so it won't slip from your hands. It is light to carry and can be worn over the shoulder or carried by hand depending on the strap length you crochet.
Free Crochet Water Bottle Holder pattern for Travel Lovers
Using this crochet water bottle holder pattern lets you choose colors and styles that match your personality or daily outfit. Whether bright and fun or calm and neutral, you can create a holder that's all your own. It also works well as a gift for friends who love to stay active.
Beginners will find the crochet water bottle holder pattern enjoyable and easy to follow. It usually involves simple stitches and a straightforward shape, making it a quick and rewarding project. Plus, it's a practical item you will use every day, so the time spent making it is well worth it.
This stylish holder keeps your bottle safe, your hands free, and your look fresh. It offers convenience combined with the creativity and comfort of crochet. Making one will add function and flair to your daily routine.
Crochet Water Bottle Holder Pattern
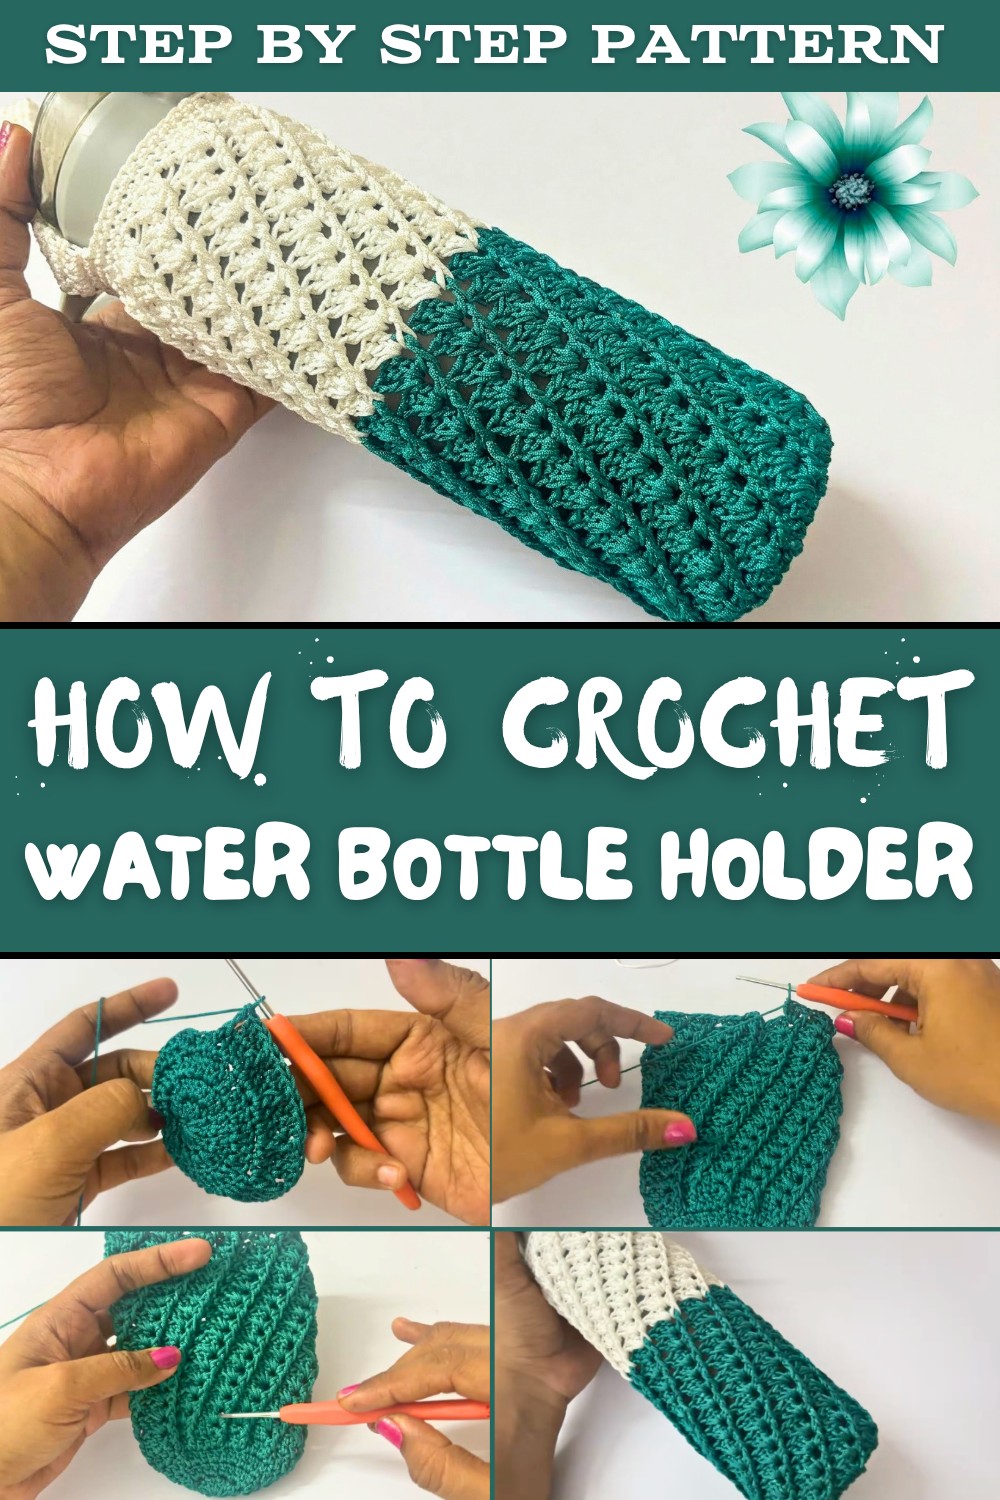
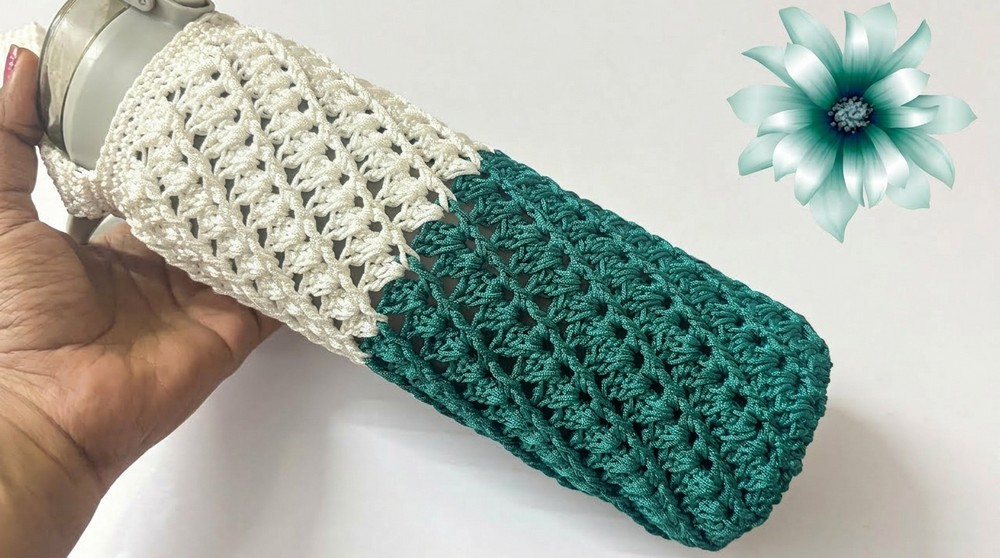
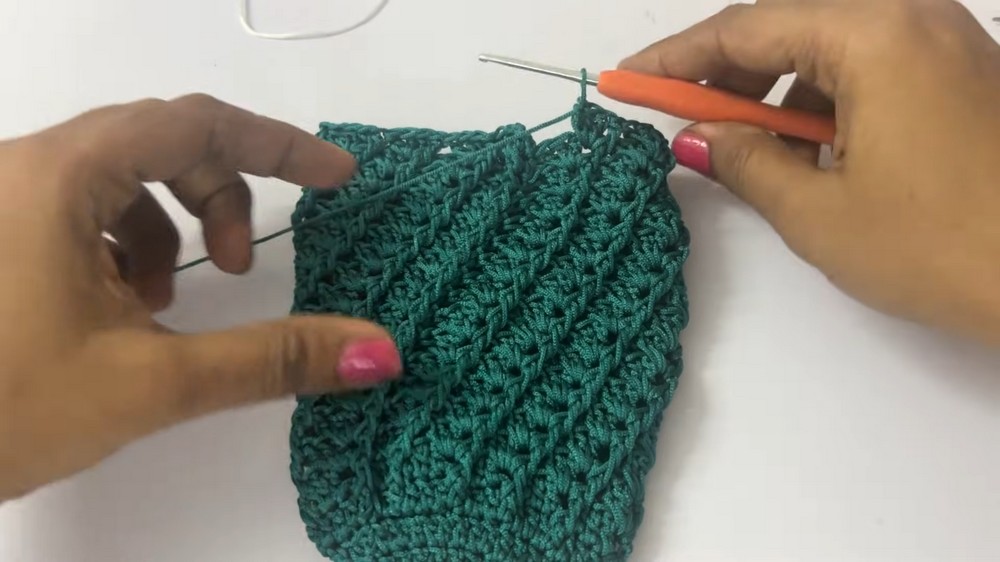
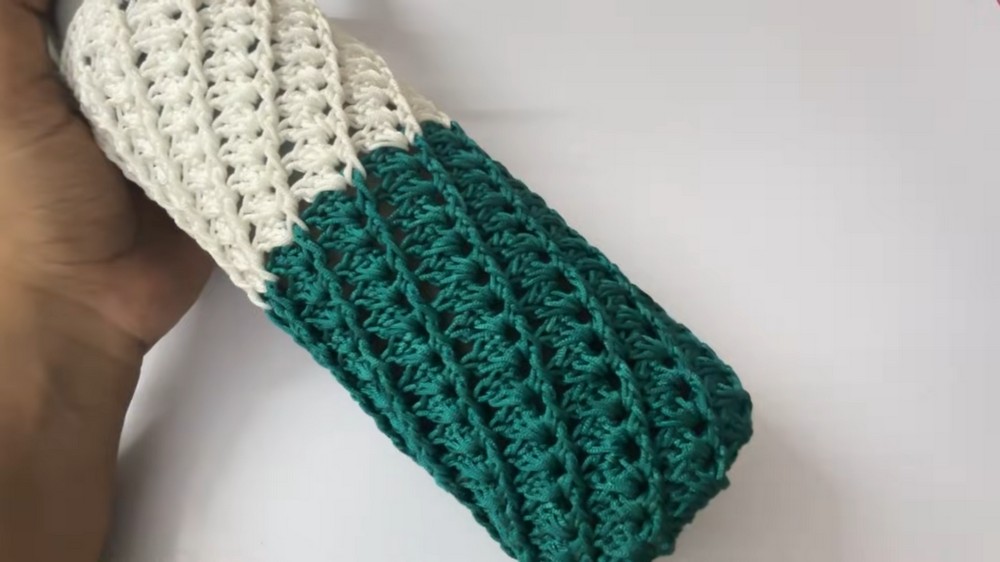
This beautifully textured water bottle holder features a snug base, a classic pattern, and a neat handle-perfect for carrying your bottle in style. Using a combination of double crochet and front post double crochet stitches provides both durability and visual interest. Available in two colors, this pattern offers the flexibility to customize according to your style.
Before You Begin
- Use 1 mm nylon crochet thread, or substitute with a fine cotton yarn if nylon is unavailable.
- Employ a 2.5 mm crochet hook, ideal for the 1 mm thread to maintain tension and stitch clarity.
- Have scissors, stitch markers, yarn needle ready for finishing and joining.
- Know how to create a magic ring, and be comfortable with basic and post stitches.
- Measure your water bottle before starting to ensure the base circumference and height fit your bottle dimensions.
- Choose your color palette-this pattern uses two colors for a stylish effect but can be adjusted for a single color.
- Prepare approximately 100 grams of thread total to complete the project.
Helpful Pattern Details
- Begins with a circular base made from double crochets in a magic ring, increasing evenly to fit bottle bottom.
- The body is constructed in rounds using a textured front post double crochet pattern combined with regular double crochets.
- Two colors are incorporated seamlessly by changing yarns and carrying yarn tails inside the work.
- The water bottle holder maintains a consistent stitch count after base increases to ensure the correct circumference throughout the body.
- The handle is created with repeated rows of single crochet stitches and joined carefully with slip stitches.
- Nylon thread requires special joining with glue for durability and a neat finish.
Construction Summary
- Start with a magic ring and crochet 12 double crochets (including chain 3 as first dc) to form the base circle.
- Increase the base circumference gradually over 4 rounds to approximately 3 inches diameter or adjusted to bottle bottom size.
- Work 20 rounds of a front post double crochet pattern alternating with sets of double crochets to create textured body.
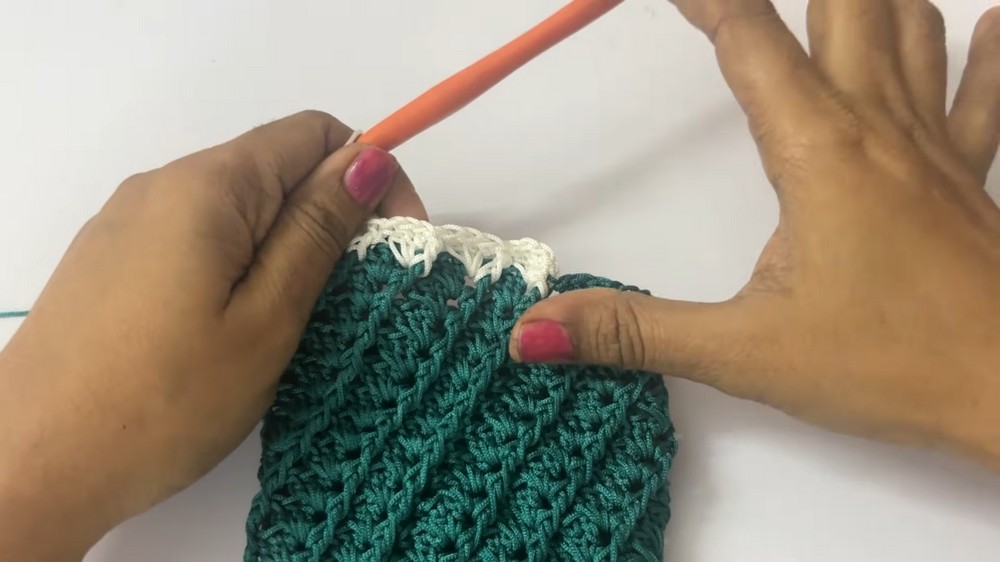
- Switch to a contrasting color and continue 12 more rounds repeating the pattern.
- Finish with 3 rounds of single crochet as a border at the top of the holder.
- Crochet a sturdy handle of single crochet stitches over chains, adjust length to approximately 23 inches.
- Join handle to holder body with slip stitches, ensuring no twisting, and secure with needle and glue for nylon thread.
Skill Level
- Designed for intermediate crocheters familiar with circular crochet, front post stitches, multiple colorwork, and neat joining.
Finished Dimensions
- Base Diameter: ~ 3 inches (7.5 cm)-adjust as needed for your bottle.
- Height of Holder: ~ 9.5 inches (24 cm).
- Handle Length (height when held): ~ 23 inches (58 cm).
Required Materials
- 1 mm Nylon crochet thread (approx. 100 g), in two colors (e.g., Rama green and off-white).
- 2.5 mm crochet hook.
- Stitch markers.
- Yarn needle.
- Fabric glue (e.g., B7000) for nylon thread ends.
- Scissors.
Gauge Information
- Not gauge critical but maintaining consistent tension is essential:
- Approximately 48 stitches per round after base increases.
- Front post double crochets creates textured fabric with slight raised ridges.
Stitch Glossary
- ch: chain
- dc: double crochet
- fpdc: front post double crochet
- sl st: slip stitch
- st(s): stitch(es)
- magic ring: adjustable starting loop used for crochet in rounds
Special Stitch Details
- Magic Ring: Creates a tight starting point for crocheting in the round to prevent gaps.
- Front Post Double Crochet (fpdc): Yarn over, insert hook from front to back around vertical post of stitch below, yarn over, pull through, yarn over, pull through loops. Creates raised "posts" adding texture and structure.
- Color Change Method: Change yarn color on last yarn over of cluster or stitch; carry yarn ends along backside securely.
- Slip Stitch Join for Seam: Used to join rounds, fasten edges, and attach handles with a clean finish.

Pattern Instructions
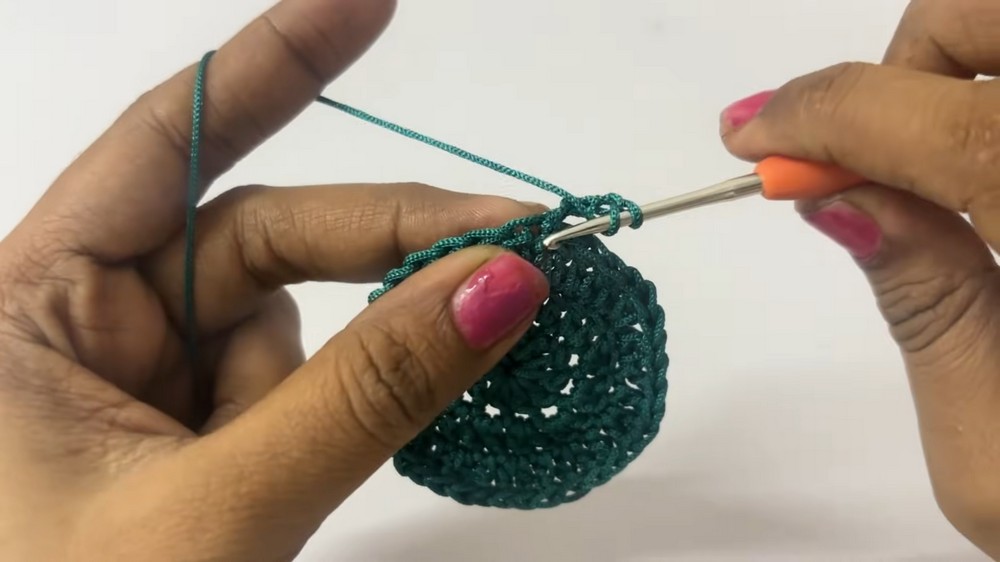
Part 1: Base of the Holder
Round 1:
- Create a magic ring.
- Ch 3 (counts as first dc), work 11 dc inside ring. (Total 12 dc).
- Tighten ring and join with sl st to top of ch 3.
Round 2:
- Ch 3, dc twice in each st around (2 dc per stitch).
- Total: 24 dc.
- Join with sl st to top of ch 3.
Round 3:
- Ch 3, dc 1 in next st, dc 2 in next st repeat around.
- Total: 36 dc.
- Join with sl st.
Round 4:
- Ch 3, dc in next 2 sts, dc 2 in next st repeat around.
- Total: 48 dc.
- Join with sl st.
Check base size-should measure about 3 inches diameter. Adjust with additional increase round if needed.
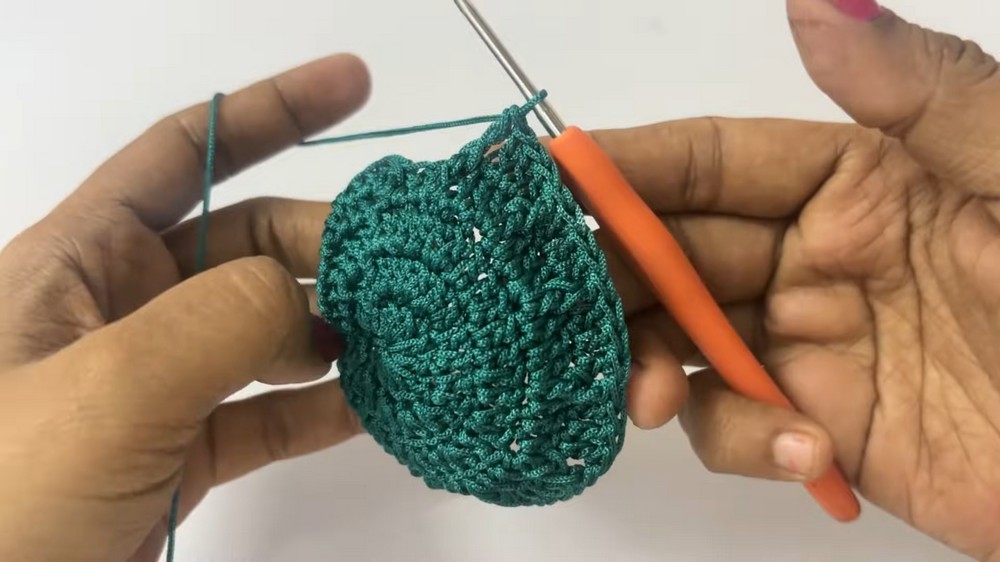
Part 2: Body Pattern Rounds (Rounds 5 to 20)
Round 5:
- Ch 1, fpdc in same st, dc in next 3 sts, fpdc in next st, dc in next 3 sts repeat around.
- Total 48 stitches; 12 fpdc.
- Join round with sl st.
Rounds 6 to 20:
- Chain 1, fpdc in same st, then pattern: 3 dc in space after each fpdc, fpdc around each fpdc stitch below.
- Repeat pattern to end of round, join with sl st.
- Maintain stitch count at 48.
Part 3: Color Change and Continuing Body (Rounds 21 to 32)
- At round 21, join new color thread using sl st at first fpdc stitch.
- Carry both yarns from previous rounds securely along back side.
- Repeat body pattern as above with new color for 12 rounds total (rounds 21-32).
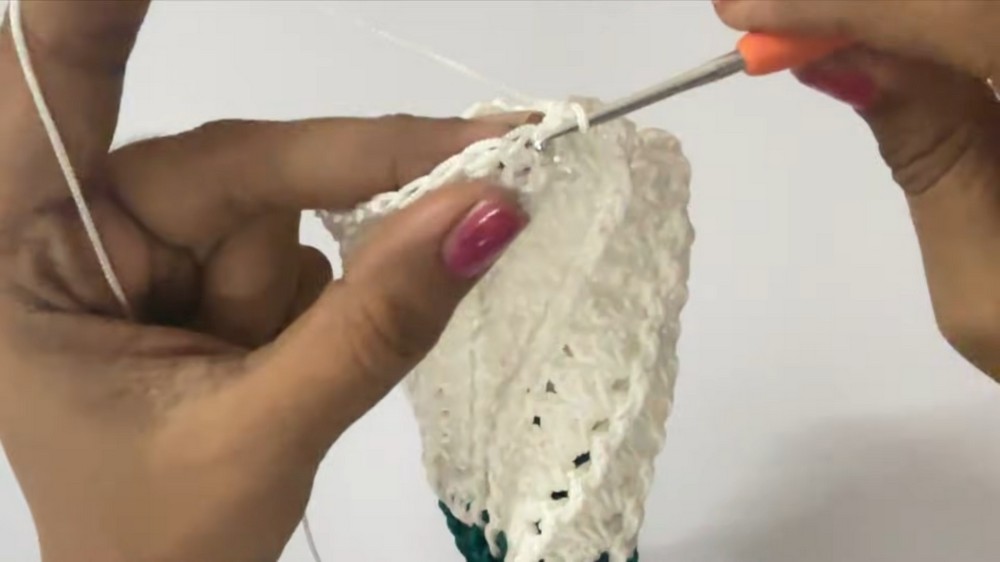
Part 4: Final Single Crochet Border (Rounds 33 to 35)
- Work 3 rounds of sc evenly around, maintaining 48 stitches per round.
- Join with sl st after each round.
- This creates a neat finish for the opening of the holder.
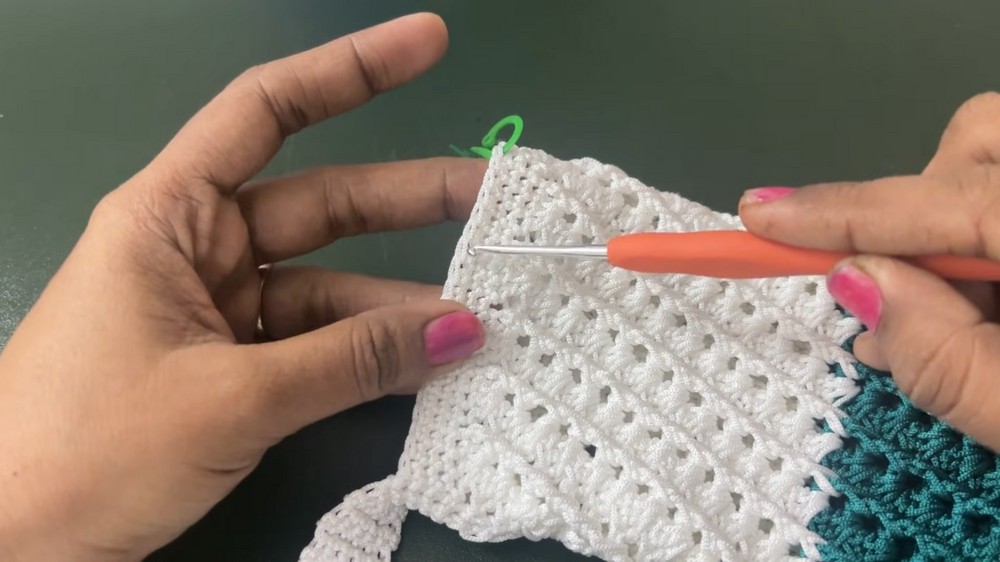
Part 5: Handle Construction
- Attach yarn at desired handle start point on holder edge.
- Ch 5, turn.
- Row 1: Sc in 2nd ch from hook and in each ch across (5 sc).
- Rows 2 and onward: Ch 1, turn, 5 sc across.
- Repeat until handle reaches approximately 23 inches (length as preferred).
- Fasten off.
Part 6: Attaching the Handle
- Lay handle flat against holder, aligning edges carefully to avoid twisting.
- Join handle edges with holder by inserting hook in back loop of holder stitch and front loop of handle stitch, working slip stitch or single crochet along join for 5 stitches wide section.
- Secure yarn ends and knot firmly.
- Use fabric glue at knots and joins (especially for nylon thread) for extra security.

Easy Explanation for Beginners
Start with a small circular base widened over 4 rounds to fit your bottle's bottom. Then work textured stitches around the holder's height, changing colors partway for a stylish contrast. The handle is a narrow strip of single crochets attached securely by slip stitching and reinforced with glue to keep it neat and durable.
Assembly and Final Steps
- Weave in all loose ends with a yarn needle securely inside stitches.
- Use fabric glue lightly on nylon thread joins to prevent unraveling.
- Block lightly if needed for neatness.
- Test the fit around your water bottle and adjust by adding or subtracting rounds before finishing.
- Style your holder with your favorite color combinations!
Troubleshooting Suggestions
- Base too small or too large: Add or subtract an increase round or adjust initial chain count for ring.
- Uneven texture on body: Check tension and ensure consistent stitch count each round.
- Handle twisted during joining: Always lay handle flat and align loops carefully before joining.
- Color change yarn tails unsecured: Carry yarns loosely inside project and knot securely at transitions.
- Nylon thread ends unraveling: Use fabric glue specifically designed for textiles to seal ends.
Alternative Uses and Creative Ideas
- Use textured stitch pattern for decorative plant hangers or pencil holders.
- Substitute cotton yarn for a softer, washable bottle cover for gym or beach use.
- Add applique or embroidered designs on the body for personalization.
- Modify handle length to create a sling bag or cooler bag.
- Create matching coasters or placemats with same stitch pattern.