Crochet Bucket Hat Free Pattern With Cute Cow Print
Wear a fun Free Crochet Bucket Hat Cow Print Pattern that is easy to follow and perfect for keeping the sun off while looking playful and stylish every day.
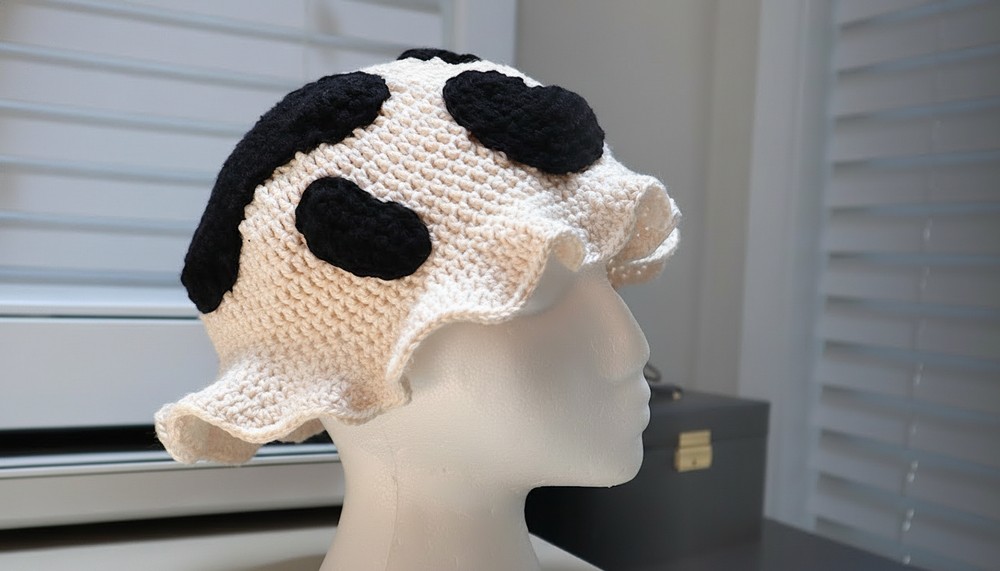
A fun and stylish hat can add charm and personality to any outfit while keeping you protected from the sun. This crochet bucket hat with a cow print design is made with soft yarn and playful black and white spots, giving it a cheerful and unique look. It is light and comfortable, making it perfect for sunny days, outdoor walks, or casual wear.
Crochet Bucket Hat With Handmade Cow Spot that's for Teens

The wide brim helps shade your face, while the smooth finish and bold pattern make it look neat and eye-catching. It is also enjoyable to make because you can practice changing colors to create the cow spots and try different sizes or color combinations. Each hat becomes a special, one-of-a-kind accessory that combines fun, style, and creativity in a simple way.

Cow Print Bucket Hat - Written Pattern
Materials
- Yarn type:
- Worsted weight / Medium (4) cotton or cotton blend is recommended for structure and breathability.
- Main color (MC): White (hat base)
- Contrast color (CC): Black (cow spots)
- Hook size:
- 5.0 mm (H-8) hook (or size needed to achieve a firm fabric)
- Notions:
- Yarn needle (for weaving ends and sewing on spots)
- Scissors
- Stitch marker (optional, useful to mark the start of each round)
Skill Level
Intermediate
You should be comfortable with:
- Working in the round using a magic circle
- Reading stitch patterns such as "increase, dc, dc …"
- Maintaining consistent tension
- Simple freeform shaping for the cow spots
Key Abbreviations (US Terminology)
- ch - chain
- sl st - slip stitch
- sc - single crochet
- hdc - half double crochet
- dc - double crochet
- st(s) - stitch(es)
- rnd - round
- inc - increase (2 stitches in same stitch)
Special Notes
- The hat is worked from the crown down, in continuous joined rounds of double crochet for the top and sides, and half double crochet with structured increases for the brim frill.
- The exact stitch counts after each round depend on how many increase rounds you choose; the video example uses 10 rounds with increases for the crown.
- The cow spots are freeform, intentionally irregular. You do not need to match them exactly; embrace asymmetry.
- Keep your tension firm so the hat keeps its shape and the brim stands out slightly rather than drooping excessively.

Pattern Instructions
1. Crown of the Hat (Top Circle)
All rounds in this section are worked in dc and joined with a sl st at the end of each round.
Round 1
- Make a magic circle.
- Ch 1 (does not count as a stitch).
- Work 10 dc into the ring.
- Pull tail to close the center tightly.
- Join with sl st to the first dc.
- Stitch count: 10 dc
Round 2
- Ch 1 (does not count as a stitch).
- 2 dc in each st around (inc in every stitch).
- Join with sl st to first dc.
- Stitch count: 20 dc

Note: This "two rounds only" version is also what's used in the video for the small round spots (worked in black). For the hat crown, continue increasing.
Round 3
Pattern: (inc, 1 dc) repeat around
- Ch 1.
- (2 dc in first st, 1 dc in next st) repeat around.
- All increases should visually stack on top of previous increases.
- Join with sl st to first dc.
- Stitch count: 30 dc

Round 4
Pattern: (inc, 1 dc, 1 dc) repeat around
- Ch 1.
- (2 dc in first st, 1 dc in next st, 1 dc in next st) repeat around.
- Join with sl st to first dc.
- Stitch count: 40 dc
Round 5
Pattern: (inc, 3 dc) repeat around
- Ch 1.
- (2 dc in first st, 1 dc in each of next 3 sts) repeat around.
- Join with sl st to first dc.
- Stitch count: 50 dc
Round 6
Pattern: (inc, 4 dc) repeat around
- Ch 1.
- (2 dc in first st, 1 dc in each of next 4 sts) repeat around.
- Join with sl st to first dc.
- Stitch count: 60 dc

Rounds 7-10
Continue in the same manner, adding one more dc between increases each round:
- Rnd 7: (inc, 5 dc) around
- Rnd 8: (inc, 6 dc) around
- Rnd 9: (inc, 7 dc) around
- Rnd 10: (inc, 8 dc) around
After Round 10 you should have a flat circle large enough to sit comfortably on the top of your head. The exact stitch count depends on your starting number, but following the pattern above from 10 dc will give:
- Rnd 7: 70 dc
- Rnd 8: 80 dc
- Rnd 9: 90 dc
- Rnd 10: 100 dc

Pattern correction / clarification:
In the video, the designer says she did "10 rows that included increases." The logical extension of the pattern is:
- Rnd 3: inc, 1 dc
- Rnd 4: inc, 2 dc
- Rnd 5: inc, 3 dc
- Rnd 6: inc, 4 dc
etc. Continue this sequence until the crown fits your head diameter.
If your head is smaller or larger, you may stop earlier or add more increase rounds; just maintain the same pattern logic.
2. Sides of the Hat
Once the crown is big enough, stop increasing.
Side Rounds
- Ch 1.
- Work 1 dc in each st around.
- Join with sl st to first dc.
Repeat this no-increase dc round until the sides reach the desired depth on your head (the designer does several rounds; for adults this is often 4-7 rounds).
3. Brim Frill
The brim is worked in hdc with structured increases to create a frilled, slightly wavy edge.
Brim Round 1 (Set-up Frill Round)
Pattern: 4 hdc, inc hdc, inc hdc repeat
- Switch from dc to hdc.
- Ch 1.
- Work 1 hdc in each of the next 4 sts.
- In next st: 2 hdc (inc).
- In next st: 2 hdc (second inc).
- Repeat: 4 hdc, inc, inc around.
- Join with sl st to first hdc.

This creates the initial ruffle and extra fabric needed for the brim.
Note: The video emphasizes: do not worry if the pattern does not "end perfectly" at the round join; you can "fudge" the last few stitches so it flows naturally. The brim is meant to be organic and not perfectly symmetrical.
Brim Round 2 (Shaping the Frill)
Pattern: long stretches of hdc between focused increases.
The designer uses the placement of prior increases as landmarks:
- Identify the single stitch between the two inc sts from the previous round.
- In that "between" stitch, work 3 hdc (inc+1).
- Between those special stitches, work 7 hdc in separate stitches.
A practical written version:
- Ch 1.
- Work 5-7 hdc (depending on how your increases fall; aim to reach the "between" stitch of the two increases from previous round).
- In the "between" stitch: 3 hdc in same st.
- Work 7 hdc, then again 3 hdc in the "between" stitch.
- Repeat this logic: whenever you reach the stitch between the previous round's double-increase, place 3 hdc in that stitch.
- Join with sl st.
This continues to encourage the brim to flare and wave.
Brim Round 3 and Onwards
The designer alternates between:
- Rounds where she does clusters of 3 hdc in the stitch between previous increases, separated by stretches of 7-8 hdc
- Rounds where she again places two consecutive hdc increases (2 hdc in one stitch twice in a row) spaced around the brim.
You may follow this repeat until the brim looks how you like:
- Repeat Round 1 style: 4-5 hdc, inc, inc.
- Repeat Round 2 style: 7-8 hdc between each 3-hdc increase in the "between" stitch.
Work 2-4 brim rounds or until you are satisfied with the frill and width. Fasten off and weave in ends.
Tip: Try the hat on between brim rounds. Stop when the brim is wide enough and has a gentle wave but still frames your face nicely.
4. Cow Spots (Appliqués)
You will make multiple freeform spots in black (CC) and sew them onto the white hat.
You can use:
A. Simple Round Spots
These use the same structure as Rounds 1-2 of the crown:
- Magic circle, ch 1.
- Work 10 dc into the ring, close the ring.
- Join with sl st. This is a small, neat circle spot.

Or:
- Magic circle, 10 sc instead of dc (for a smaller, denser spot).
Fasten off, leaving a long tail for sewing.
B. Freeform Lopsided Spots
These are intentionally irregular:
- Make a slip knot, then chain any number (no counting required; more chains = larger spot).
- Starting in second ch from hook, work a mix of hdc and dc back along the chain:
- For example, 3 hdc in second ch, then hdc in next 4 ch, then dc in remaining ch.
- In the last ch, work 3 hdc so you can turn and work down the other side of the chain.
- Work your way back along the underside of the chain, again mixing hdc and dc in any order to create bumps and uneven edges.
- Join with sl st somewhere near the start to close the shape into a loop.
- For a second round, work mostly hdc around, sometimes placing 3 hdc in a "corner-ish" stitch to round it out further, sometimes dc on the "taller" side.
When the shape looks pleasingly lopsided, fasten off, leaving a long tail.
5. Attaching the Spots
- Place the hat on a flat surface. Arrange the spots around the crown and sides in a random cow‑like pattern.
- Using a yarn needle and the long tails, sew each spot down with whip stitches or small running stitches around the edges, taking care not to pull too tightly and distort the hat shape.
- Weave in all remaining ends on the inside.
Tips
- Fit & Size:
- Measure your head circumference and compare it with the circumference of your crown (after the increase rounds). Stop increasing when they match or are slightly larger (cotton does not stretch much).
- Structure:
- Cotton or cotton blends help brim hold shape. If you use acrylic, consider blocking gently or using a smaller hook to tighten the fabric.
- Brim Symmetry:
- The brim is intentionally a bit wavy and not mathematically precise. The designer explicitly suggests "don't stress" if your increases don't line up perfectly - this adds character.
- Spots:
- Vary size and shape for a natural cow‑print look. Use more small circles and fewer large blobs to balance the hat visually.
Conclusion
This cow‑print bucket hat is a stylish, lightweight accessory that provides shade while showcasing texture, shaping, and freeform design. You learned how to:
- Work a double crochet crown with systematic increases
- Shape a brim with half double crochets and planned ruffles
- Create and attach freeform appliqué spots for a cow print effect

With practice, you can easily customize this pattern by changing colors, brim width, or even adding ear‑flaps or ties. Enjoy wearing your unique hat in the sun, and consider making additional versions in different color schemes for friends and family.