
Easy Daisy Sunflower Top: Crochet Pattern You’ll Love
Infuse your look with the free crochet daisy sunflower top pattern that's light, breezy, and perfect for sunny days and relaxed summer vibes.
Bright and cheerful floral designs can add a touch of happiness to any outfit. The Daisy Sunflower motif brings a fresh, natural vibe that makes clothing feel lively and unique. The Crochet Daisy Sunflower Top pattern combines these lovely flowers with an airy fabric that sits comfortably on the skin. The open stitches allow for excellent breathability, making the top perfect for warm weather or layering during cooler days. Stretchy and light, it moves easily with your body, giving you both style and ease throughout the day.
Crochet Your Cute Daisy Sunflower Top: Quick & Simple Guide

The benefits of this crochet top are many. It offers a customizable fit since you control the size and colors, allowing personal touches that match your style perfectly. Pairing it with jeans or skirts can change its vibe from casual to a bit dressier, making it a versatile addition. The floral patterns offer playful detail that stands out without overwhelming your look. This makes the top suitable for many occasions, whether running errands, meeting friends, or relaxing at home.

Comfort is another key feature of this design. Yarn that feels gentle to the touch combines with a breathable texture, avoiding heaviness or stiffness. This balance ensures the top stays pleasant to wear all day long, while its handmade quality promises durability. Putting on this crochet top brings both coziness and charm, blending nature-inspired beauty with everyday wearability. The Crochet Daisy Sunflower Top pattern offers a wonderful way to add a unique, comfortable piece to your wardrobe, perfect for those who enjoy simple but charming fashion.
Daisy Granny Square Crochet Top Pattern
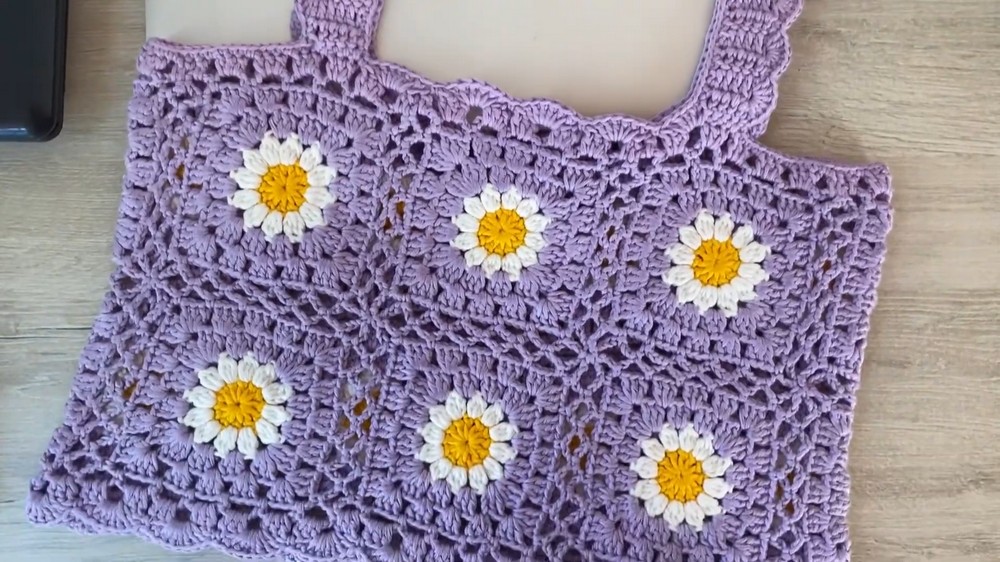
Create this charming, daisy-inspired granny square crochet top perfect for warm days and casual outings. The pattern uses colorful granny squares worked in rounds and joined with delicate chain spaces, forming a beautiful lightweight crop top adorned with floral motifs. This tutorial guides you step-by-step in crafting and assembling your own stunning daisy granny square top.
Before You Start: Essential Preparations and Tips
- Choose a high-quality cotton or cotton-blend yarn for breathability and comfort; lighter worsted or DK weight yarn works well.
- Color selection: Yellow (for daisy centers), white or cream (for petals), and a soft lilac or alternate color for square borders, or customize as you prefer for sunflower or daisy variations.
- Use a crochet hook size recommended by your yarn label; typically a 4.0 mm hook suits DK yarn.
- Keep tapestry needle, scissors, and stitch markers handy for finishing and joining squares.
- Familiarize yourself with basic granny square rounds, slip stitches, single crochet, chain stitches, and double crochet for edging.
- Prepare to block your finished squares for easier joining and uniformity.
- Consider measuring as you create squares to ensure consistent size.
- The size and number of squares can be adapted to fit personal measurements; customize your top width and length accordingly.
Pattern Highlights and Working Details
- This pattern expands on a traditional granny square with a three-color scheme representing daisies or sunflowers.
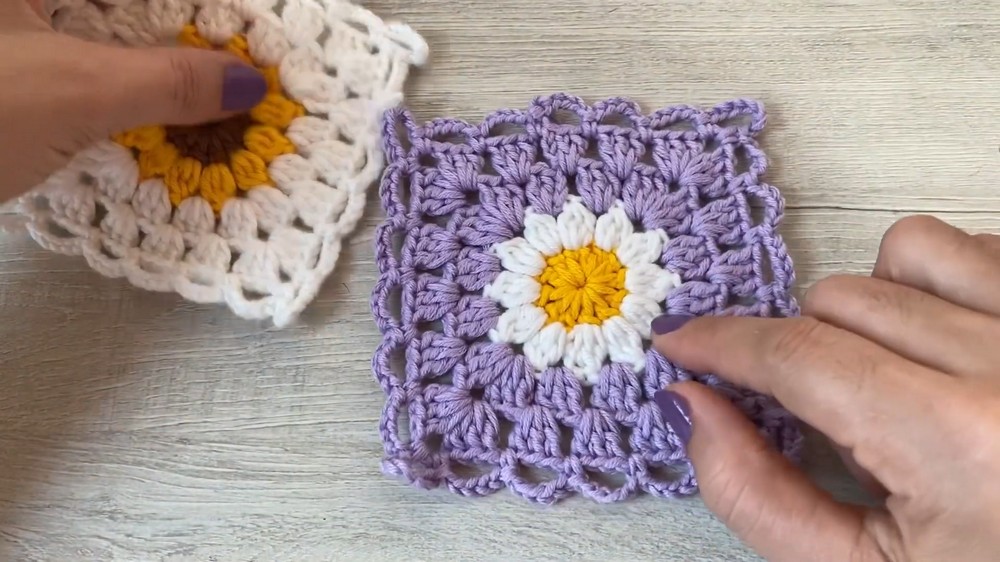
- Each square is worked in rounds: starting with a yellow center, transitioning to a white petal round, and finishing with a lilac border.
- Squares are joined using single crochet and chain spaces, creating a lacy and flexible join perfect for garment wear.
- Emphasizes neat chain space joins for airflow and comfortable fit.
- Edging and straps are worked last with fans and high-point stitches for decorative detail.
- Pattern uses consistent repeat motifs for ease of memorization and smooth working flow.
- Recommended for intermediate beginners who are comfortable with granny square basics and joining techniques.
Construction Summary of the Crochet Daisy Top
- Crochet multiple granny squares following the color pattern described.
- Join the squares in rows and columns using single crochet and chain joining technique.
- After joining, work a last round trim of fans and high stitches to the lower edge for a polished finish.
- Crochet straps separately and attach with secure single crochet joins to the top's front and back neckline edges.
- Finish armholes and neckline with eye-catching fan stitches worked into single crochet spaces.
- Block the final top to smooth creases and unify the shape.

Skill Level
- Suitable for intermediate beginners and beyond; comfortable with color changes, granny squares, and joining methods needed.
Final Garment Dimensions
- Approximately 40 cm (16 inches) width front, 40 cm (16 inches) width back (laid flat).
- Length approximately 23 cm (9 inches) without straps; adjust number of rows/squares for desired length.
- Straps approximately 32 cm (12.5 inches) in length.
- Measures vary slightly with yarn choice and tension; adjust accordingly.
Materials List
- DK or light worsted cotton or cotton-blend yarn in three colors: yellow, white (or off-white), and lilac (or alternate).
- Crochet hook size 4.0 mm (G-6).
- Tapestry needle for weaving ends.
- Stitch markers (optional).
- Blocking tools (pins, mats, spray bottle).
- Scissors.
Sizing Information and Customization
- Make 7 granny squares for a size medium; increase or decrease squares for other sizes.
- Squares measure approximately 12 cm (4.7 inches) each after blocking.
- Adjust strap length and number of rows worked for desired torso and strap fit.
- Check accurate sizing before joining squares.
Gauge Details
- Gauge is approx. 12 stitches and 6 rounds per 10 cm square (4 inches).
- Gauge swatch recommended to achieve consistent square sizes.
Stitch Abbreviations
- ch = chain
- sl st = slip stitch
- sc = single crochet
- dc = double crochet
- sp = space
- st = stitch
Special Techniques Defined
- Granny Square Round: Multiple clusters of dc stitches grouped in corner and side spaces, separated by chain spaces.
- Chain Space Join: Joining squares by crocheting into chain spaces of adjacent squares with sc and chains for flexible seams.
- Fan Stitch: Group of multiple dc stitches (typically 5-7) worked in one stitch or space forming a fan or shell for decoration.
Detailed Crochet Instructions
Part 1: Crochet One Granny Square
Round 1 (Center - Yellow):
- Ch 4, join with sl st to form a ring.
- Ch 3 (counts as first dc), work 11 dc into ring. Join with sl st to top of ch 3. (12 dc total)
Round 2 (Petals - White):
- Change to white.
- Ch 3, skip next dc, dc in next dc around (creating loop spaces). Join with sl st.
Round 3 and 4 (Border - Lilac):
- Work classic granny square rounds using dc clusters separated by ch 1-2 spaces.
- In corners: (3 dc, ch 2, 3 dc). On sides: clusters of 3 dc separated by chain 1.
- Finish round 4 with ch spaces to allow for joining.
Part 2: Joining Granny Squares
- Lay out your squares in desired order.
- Join squares by inserting hook into chain spaces of two adjacent squares, slip stitching and chaining 5 to connect spaces, then sc into next space of the adjacent square.
- At corners, work 7 chains between corners to elegantly separate.
- Crochet across edges this way until all squares are joined as front and back panels.


Part 3: Adding the Final Round
- Work around the entire joined panel with a round of single crochet and chain spaces (5 chains between sets of 3 dc) for a lacy edge.
- Where panels connect, join with slip stitches to reinforce seam and maintain flexibility.

Part 4: Crochet Straps
- Attach yarn at upper corners.
- Ch 5, work 5 dc into first chain.
- Turn, ch 2 (not counted as dc), work 5 dc across.
- Repeat for 28 rows or until strap measures approx 32 cm.
- Attach straps securely to front and back panels using single crochet stitches along neckline edges.

Part 5: Edging Neckline and Armholes
- Work fan stitches (5-7 dc in one stitch, separated by chains) around neck and armhole edges for a graceful finish.
- Finish with slip stitch and weave in yarn ends.
Explanation for Beginners
This pattern uses traditional granny square rounds with a colorful daisy-inspired palette. Squares are joined with chains and slip stitches that create breathable seams. Straps and edging use simple dc and fan stitches to make a stylish, comfortable top.
Assembly and Finishing Touches
- Seam squares gently and evenly for flat joins.
- Weave in all yarn ends with tapestry needle for durability.
- Block joined panels and straps for uniformity and neat appearance.
- Attach straps securely to front and back shoulder edges.
- Consider light steam blocking for cotton yarn to finalize shaping.
Potential Challenges and Solutions
- Inconsistent square sizes: Ensure consistent gauge and tension; consider blocking individual squares before joining.
- Gaps in join seams: Maintain consistent chain counts and secure joins with slip stitches; use stitch markers to align squares.
- Loose strap attachment: Secure straps with tight single crochet seams and reinforce by back stitching over joins.
- Difficulty in fan stitch placement: Mark stitch locations with stitch markers if needed for consistent fan shapes.
Creative Project Variations and Uses
- Customize colors and create sunflower or other floral variations.
- Use squares to make a matching accessory such as a bag or shawl.
- Convert granny squares into a baby blanket using same joining technique.
- Experiment with different yarn textures such as bamboo or silk blends for unique drape.
- Create festive tops for seasonal wear with color variations.