
Free Crochet Amigurumi Sunflower Pattern for Bright Room Decor
Follow this easy pattern to crochet a happy Amigurumi Sunflower, perfect for adding color to your space or surprising someone with a handmade gift.
Sunflowers are like little pieces of sunshine, and now you can make your very own with ease. This guide will teach you how to crochet a soft, adorable sunflower that will brighten up your day and add warmth to any corner of your home. With its soft, round brown center, cheerful yellow petals, and a delightful green stem, this sunflower looks as happy as it feels. The petals are carefully made to stand tall, thanks to a touch of fabric glue that makes them sturdy yet charming. Add cute safety eyes and a smile, and suddenly your sunflower has its own personality, ready to bring joy to everyone who sees it.
Crochet a Amigurumi Sunflower Free Pattern for Nursery Decor

This sunflower isn't just pretty to look at-it's something you can cherish or gift to someone special. Use it to decorate your study table, place it by the window, or even give it as a heartfelt present to brighten a friend's day. Its lightweight and simple design make it easy to carry anywhere.
Bring a burst of happiness into your life with this delightful crochet sunflower. It's simple enough for beginners but charming enough to make anyone fall in love with it.
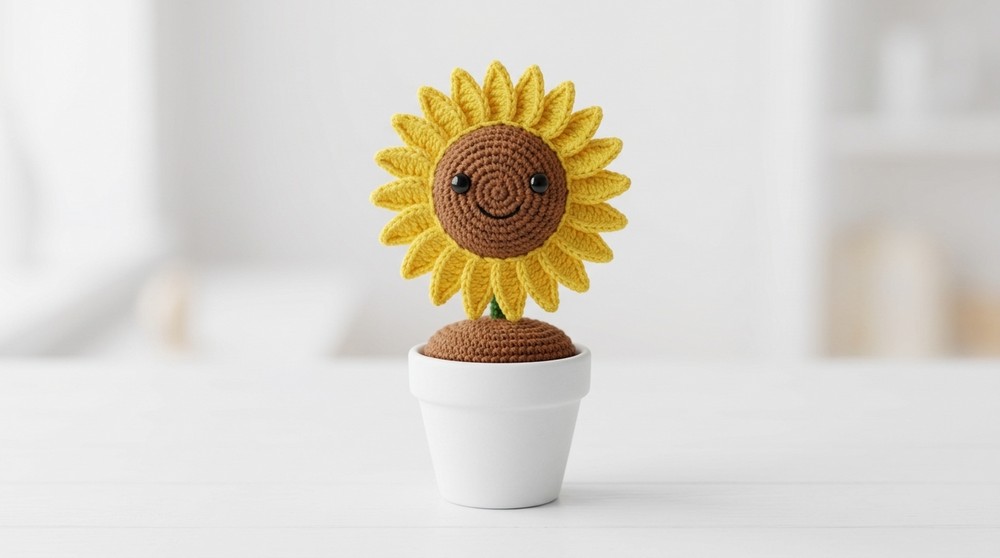
Amigurumi Sunflower Crochet Pattern
Materials
- Yarn
- Light brown yarn (for the front of the sunflower center)
- Dark brown yarn (for the back/top of the center)
- Green yarn (for the stem)
- Yellow yarn (for petals)
- Fiber content: cotton or acrylic; you may mix (as shown in the pattern)
- Tools and Notions
- 3 mm crochet hook
- Toy stuffing (polyester fiberfill)
- Safety eyes
- Yarn / tapestry needle
- Safety pin or standard stitch marker
- Scissors
- Hot glue
- Fabric glue
Special Techniques
- Magic Ring: A circular starting method used to avoid a hole at the center; stitches are worked into an adjustable loop, then pulled tight.
- Single Crochet (sc): Main stitch used throughout the body and stem.
- Half Double Crochet (hdc): Used in petals.
- Double Crochet (dc): Used in petals.
- Treble (or Triple) Crochet (tr): Used in petals to add height.
- Increase (inc): 2 sc in the same stitch.
- Invisible Decrease (inv dec): A neat decrease done in the front loops of two stitches to avoid a bulky look.
All rounds are worked in continuous spirals, not joined with slip stitches, unless otherwise specified. Use the stitch marker to mark the first or last stitch of each round.
Abbreviations
- MR - Magic ring
- ch - chain
- sc - single crochet
- hdc - half double crochet
- dc - double crochet
- tr - treble crochet
- inc - increase (2 sc in same stitch)
- inv dec - invisible decrease (2 sc together using front loops)
- sl st - slip stitch
Part 1: Front of Sunflower Center (Light Brown)
Round 1
- Make a magic ring, ch 1.
- Work 6 sc into the ring.
- Pull the tail to close the ring. Place stitch marker in the last stitch.
- (6 sc)
Round 2
- Work 2 sc in each stitch around (inc in every stitch).
- (12 sc)

Round 3
- 1 sc, inc repeat around (sc in first stitch, 2 sc in next stitch).
- (18 sc)
Round 4
- 2 sc, inc repeat around.
- (24 sc)
Round 5
- 3 sc, inc repeat around.
- (30 sc)
Round 6
- 4 sc, inc repeat around.
- (36 sc)
Round 7
- 5 sc, inc repeat around.
- (42 sc)
Rounds 8-12 (5 rounds)
- Sc in each stitch around.
- (42 sc per round, no changes in stitch count)
At this point, you have a rounded light brown "front" of the sunflower.

Part 2: Shaping the Back of the Front (Light Brown, Decreases)
Now we begin decreasing to close the back of this section.
Round 13
- 5 sc, inv dec repeat around.
- (36 sc)
Round 14
- 4 sc, inv dec repeat around.
- (30 sc)
Round 15
- 3 sc, inv dec repeat around.
- (24 sc)
Add stuffing now:
Lightly stuff the front section. Do not overfill; it should hold a round shape without stretching the stitches excessively.
Round 16
- 2 sc, inv dec repeat around.
- (18 sc)
Add a bit more stuffing if needed so this portion remains firm.
Part 3: Stem (Green Yarn)
Now you change yarn to green.
- On the next stitch after Round 16, join green yarn. The decreases form a small opening; the stem builds directly onto it.
- Place stitch marker at the last stitch after the yarn change.
Rounds 17-26 (10 rounds, Green)
- Sc in each stitch around.
- (18 sc per round)

Work these 10 rounds as a straight tube. Add stuffing as you go to keep the stem firm and upright. Do not stuff so firmly that it distorts the stitches.
When you finish Round 26, you have a long green stem with the light brown sunflower front attached at the bottom.
Part 4: Back of Sunflower Center (Dark Brown Yarn)
You now switch from green to dark brown.
- Change yarn at the end of Round 26 to dark brown yarn.
- Place the stitch marker at the last stitch in dark brown.
- Cut the green yarn and secure the tail.
Round 27
- 2 sc, inc repeat around.
- (24 sc)
Round 28
- 3 sc, inc repeat around.
- (30 sc)

Round 29
- 4 sc, inc repeat around.
- (36 sc)
Round 30
- 5 sc, inc repeat around.
- (42 sc)
Round 31
- 6 sc, inc repeat around.
- (48 sc)
Rounds 32-34 (3 rounds, Dark Brown)
- Sc in each stitch around.
- (48 sc per round)
At this point you have a slightly thick dark brown disc forming the back of the flower head.
Finish the dark brown section:
- Work a sl st in the next stitch.
- Ch 1 and fasten off.
- You do not need a long tail as this section is later attached and/or hot glued to the pot or the internal support.
Part 5: Petals (Yellow Yarn)
You will make 20 identical petals.
- Leave a long tail at the beginning of the yellow yarn for sewing later.
- Make a slipknot and attach yarn to your hook.
Each petal is made as follows:
Foundation chain
- Ch 9.
Work back along the chain:
- In 2nd chain from hook: 1 sc.
- Next chain: 1 hdc.
- Next chain: 1 dc.
- Next two chains: 1 tr in each of the next 2 chains (2 tr total).
- Next chain: 1 dc.
- Next chain: 1 hdc.
- Last chain: 1 sc.
This completes one petal.
Without breaking yarn, you begin the next petal:
- Ch 9 again and repeat the exact same stitch sequence:
- 2nd ch from hook: sc
- next: hdc
- next: dc
- next 2: tr, tr
- next: dc
- next: hdc
- last: sc

Continue this sequence until you have 20 petals along one long strip of yellow stitching.
When the 20th petal is complete:
- Ch 1.
- Fasten off.
You will have a long chain of petals connected at the base.
Part 6: Stiffening the Petals
To help the petals stand and hold shape:
- Lay the strip of petals flat on a protected surface.
- Apply fabric glue to each petal (thin, even layer).
- Make sure to cover the entire surface but avoid saturating the yarn excessively.
- Allow all 20 petals to dry completely. This step is important; do not assemble while wet, or the petals may lose their form.
Once dry, the petals will be slightly stiffer and less floppy.
Part 7: Assembly
Attaching Petals to the Head
- Position the dark brown top part of the sunflower so that the petals will be sewn around its outer edge.
- Using the long yellow tail or additional yellow yarn and a needle, sew the base of each petal evenly around the dark brown circle.
- Space them evenly so there are no large gaps.
- Work from the back side, securing the bottom of each petal snugly so they form a neat ring.

You may sew the entire strip in one continuous round, curving the strip so each petal stands out around the edge.
Securing the Head and Stem
Depending on your use (e.g., placing in a pot):
- Insert the stem into the pot or into a support (such as foam inside a pot).
- Use hot glue to secure the base of the stem into the pot or support if desired.
- You may also apply hot glue between the back of the sunflower head and the pot rim or internal structure for extra stability.
Facial Details
- Attach safety eyes on the light brown front of the sunflower. Place them symmetrically.
- Secure safety eyes as per manufacturer's instructions; use hot glue on the back washers for added durability if desired.
- With a needle and suitable thread or yarn, stitch a simple smile or mouth to give the sunflower a friendly face.
Finishing
- Check for any visible yarn tails.
- Weave all tails neatly into the surrounding stitches using a tapestry needle.
- Add more stuffing if any part feels too soft or deflated (especially the front center and the top section).
- Inspect the petals to ensure they are all secured and stiffened properly.
Your amigurumi sunflower is now complete.
Tips and Suggestions
- Stitch Marker Use: Always keep your stitch marker in the last or first stitch of the round to avoid miscounting.
- Consistent Tension: Maintain even tension to prevent wavy edges or uneven shaping.
- Stuffing: Stuff gradually as you crochet; do not leave stuffing until the very end of narrow sections, as it will be harder to distribute evenly.
- Customization:
- You may adjust petal count (more petals for a fuller look, fewer for a simpler style).
- Try different colors for the petals or center for a playful variation.
- Care: Keep the sunflower away from direct moisture. Spot clean gently with a damp cloth if needed; avoid soaking because of the fabric glue and stuffing.

Final Words
This amigurumi sunflower pattern is straightforward yet delightful, suitable for those comfortable with basic crochet in the round. With careful attention to rounds, increases, decreases, and finishing, you will have a cheerful piece that works well as a décor item, a desk companion, or a gift.