
Learn How to Crochet the Perfect Halter Top – Free Pattern
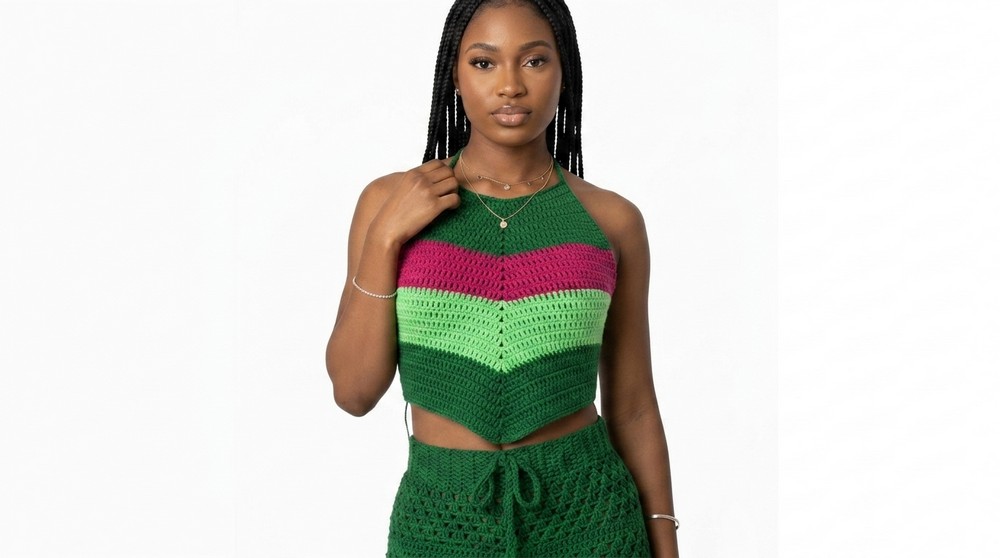
Leave boring outfits behind with this free crochet cute halter top pattern and enjoy a fresh handmade look all season long.
A plain and ordinary top can take away the charm of your outfit and leave you unprepared for those bright sunny days. This halter top is not only easy to make but also super stylish, lightweight, and comfortable. It will quickly become your favorite piece for sunny days, beach outings, or casual hangouts. Whether you want a playful or elegant look, this top can be styled in many ways to fit your mood.
Free Crochet Pattern: The Ideal Halter Top for Warm Days

It features a lovely neckline that highlights your shoulders, with straps that crisscross elegantly at the back. What makes it unique is that you can choose your favorite colors or yarns to make it your own. Whether you prefer simple solid shades or fun multi color patterns, this project is perfect for expressing your creativity.
You can adjust the size to fit perfectly by either increasing or decreasing the foundation chain length. The pattern uses basic crochet stitches like double crochets, so it's simple enough for beginners to follow while still being exciting for more experienced crocheters. The color changes in the pattern also let you create a fun and vibrant look.
Pair it with jeans, shorts, or skirts for a stylish summer outfit. It's also a great handmade gift for family or friends. This pattern teaches you step by step how to crochet the top, switch colors, and finish it neatly for a polished and professional look. Start crocheting this cute halter top and enjoy both the fun of making it and the pleasure of wearing something handmade that's full of personality and charm.
Crochet Halter Top Pattern
Skill Level: Beginner-Friendly
Materials Needed
To create this stunning halter top, you'll need the following materials:
- Yarn: Any type of yarn is suitable for this pattern, and you can choose three colors for contrast. For best results, use lightweight cotton or acrylic yarn for summer wear or thicker yarn for a cozy cold weather option.
- Crochet Hook: 4.0 mm crochet hook.
- Scissors: To neatly trim the yarn after securing ends.
- Measuring Tape: Essential for achieving proper measurements for your bust, length, or any other customizations.
- Stitch Markers (Optional): These are helpful for marking your beginning points or stitches for increased accuracy.

Gauge
Achieving the right gauge is key to ensuring the top fits perfectly. Use the foundation chain and double crochet (dc) stitches to create a 4x4 inch (10x10 cm) swatch. Adjust your hook size, if necessary, to match this gauge.
- Gauge: 10 dc and 5 rows = 4 in (10 cm).
Finished Size
The finished size of the halter top can be customized to fit your unique measurements. Specifically, the bust to bust measurement (underarm to underarm) and the desired length of the top are your key considerations. For reference, the pattern created in the video transcription has a:
- Bust to bust width: 20 inches
- Top length: 13.5 inches (including single crochet edge).
Additional straps crisscross the back for adjustability.
Customization Options
- Color Choices: Choose different color combinations to match your style or wardrobe. This pattern uses three colors, but feel free to explore with more or less.
- Strap Styles: You can customize the length of the crisscross straps as desired, depending on your back design preference.
- Sizing Adjustment: Increase or decrease the foundation chain and rows to match your required size (ensure the foundation chain is always an odd number).
Step by Step Pattern Instructions
Foundation Chain
- Begin by creating a slip knot.
- Chain an odd number of stitches. For example: 33 stitches for a medium size. Adjust the chain length to suit your measurements (bust to bust) but maintain an odd number.
- Example: For a larger size, you may chain 35 or more.
- Ensure your chain is straight and not twisted.
Tip: You can lay your chain on a flat surface to double check that it is aligned.

Row 1
- Chain two extra stitches at the end of the foundation chain.
- Skip the last two chains, and in the third chain from the hook, work a double crochet (dc).
- Continue making 1 double crochet in each stitch across until you reach the end.
- At the end of the row, you should have the same number of stitches as your foundation chain (e.g., 33 double crochets).

Row 2: Adding Increases
- At the beginning of Row 2, chain 2 (this does not count as a stitch).
- In the first stitch, place 2 double crochets (dc).
- Work 1 double crochet in each stitch across until you reach the middle stitch (calculate this by folding your row in half and marking the middle).
- For example, in a row of 33 stitches, the middle stitch is the 17th stitch.
- In the middle stitch, place 2 double crochets (dc).
- Continue working 1 dc in each stitch until you reach the last stitch of the row. In the last stitch, place 2 double crochets (dc).

Now you've created the beginning of the shaping for the halter top.

Rows 3 to 8
- Start each row with chain 2 (does not count as a stitch).
- At the start and end of each row, make 2 double crochets in the first and last stitches.
- Continue working 1 double crochet in each stitch between increases.
- At the middle stitch, place 1 double crochet, chain 1, and 1 double crochet to maintain the center point increase.
Repeat rows with this increase pattern until you complete 8 rows in this color, or 7 rows before your desired color change.
Changing Colors
- To change colors, work your final stitch but do not complete the last yarn over; leave two loops on the hook.
- Join your new color by pulling the new yarn through the last two loops.
- Optional: Tie the two yarn ends to secure the join.
- Chain 2 with the new color and begin a new row following the established pattern (increasing at the first stitch, middle stitch, and last stitch).

Repeat Rows with Color Changes
- Repeat the steps above in your new color for eight rows (or desired length).
- Continue switching colors at regular intervals-be sure to repeat the same increasing pattern.
Achieving the Desired Width
- Continue adding rows until you've reached your bust to bust measurement (underarm to underarm).
- Measure this as the total width of the halter from one side to the other.
- For example, 20 inches was used in the original pattern.

Stopping Increases
- Once you've achieved your bust width, stop increasing.
- At this point, only make 1 dc in each stitch at the edges, not 2 dc.
- Maintain the chain 1 and 1 dc increase at the middle stitch.
- Repeat rows without edge increases until you've reached your desired top length (measuring from the neckline down).
Adding the Edging
- Chain 1 and create single crochet (sc) stitches evenly around the edge.
- In each double crochet stitch, place one single crochet.
- In areas where you switched colors previously, change the color of your single crochet to match for a clean look.
- Work around the entire top, including the neckline. When finished, slip stitch into the first stitch, chain 1, and cut the yarn.

Strap Creation
- Using double strands of yarn (or more if you prefer thicker straps), attach the yarn to the top corner of your neckline.
- Chain a long length of chain stitches for the crisscross design at the back.
- The chain should be long enough to create an "X" at the back and tie comfortably. Adjust to fit the wearer.
- Create a second strap for the other corner of the neckline.

Final Assembly
- Crisscross the straps across the back, threading through stitches or rows of your choice, and tie the loose ends together for a secure fit.
- Weave in all loose ends with a yarn needle or secure them neatly with knots. Cut any remaining excess yarn.

Conclusion and Tips
- This halter top can be styled in multiple ways. Pair it with high waisted shorts for a casual look or layer it under a blazer for a chic touch.
- Customization is encouraged. Play around with different yarn types, colors, and sizes to create a one of a kind piece.
- For best results, block the finished top to ensure even stitches and optimal drape.
Thank you for following this pattern. We hope you enjoy making this lovely halter top. If you have any questions or need further assistance, feel free to reach out in the comments section.
