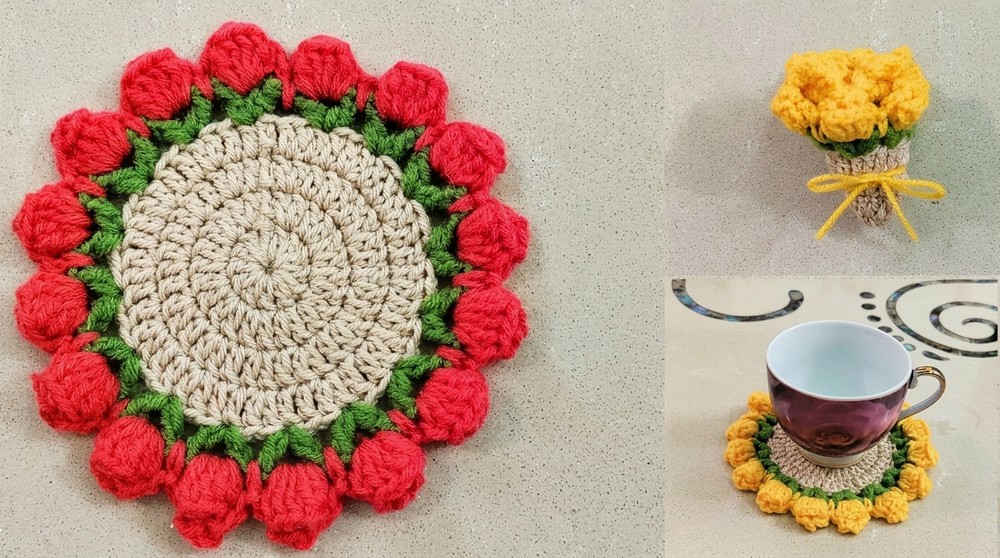
Simple Free Crochet Flower Bouquet Coaster Pattern for Beginners
Decorate tabletops beautifully with Free Crochet Flower Bouquet Coaster Pattern featuring pretty floral details and charming everyday appeal.
A table can easily get damaged by a water ring or spill if left unprotected. That's why having something both beautiful and useful like a crochet flower bouquet coaster pattern is a great idea. This coaster helps keep your furniture safe from moisture while adding a colorful, handmade touch to your home. It looks like a small bunch of flowers, bringing freshness and charm to your table setting. The coaster is soft yet sturdy enough to catch drips from a cup or glass, making it perfect for everyday use or special occasions.

Quick Free Crochet Flower Bouquet Coaster Pattern Guide
Beginners will find this pattern simple to follow, offering a fun way to learn crochet while creating something practical. You can choose colors to match your kitchen or living space, brightening the room without much effort. Plus, the coaster is lightweight and easy to clean, so it stays fresh for a long time. Besides protecting your surface, it adds comfort and style to your home and makes a lovely handmade gift.
Crocheting this coaster is a calming and rewarding experience that turns yarn into a cheerful bouquet. Whether under a steaming cup of tea or a cold glass of juice, a crochet flower bouquet coaster pattern brings both function and beauty to your daily life. It's a simple way to keep your furniture safe while brightening your surroundings with a splash of floral joy.
Tulip Crochet Coaster Pattern
Create a charming and functional tulip coaster combining classic rounds of double crochet with a delicate tulip flower motif around the edge. This beginner-friendly pattern uses a magic ring start, increasing rounds for the base, a pretty leaf border, and raised tulip flowers worked in popcorn stitches to add texture and elegance. Follow this easy step-by-step guide to crochet a unique coaster perfect for protecting your tables or gifting.
Preparation & Materials Overview
- Yarn: Three-ply yarn is recommended. You'll need two colors - one for the base of the coaster (e.g., beige) and another for the tulip flowers and border (e.g., green for leaves, pink or red for tulips).
- Hook: Use a 3 mm crochet hook suitable for yarn weight to ensure tight, neat stitches.
- Tapestry Needle: For weaving in ends neatly after finishing.
- Scissors: To cut yarn ends.
- Optional: Stitch markers to track rounds if needed.
Essential Notes on the Pattern
- Construction starts with a magic ring foundation followed by rounds of double crochet to create a circular base.
- Each round features systematic increases to expand the circle evenly.
- The final round before the floral accents consists of V-stitches (double crochet, chain 2, double crochet) forming the leaf border.
- Tulip flowers are crocheted around the border by working six double crochets plus a popcorn stitch into the chain spaces of the V-stitches.
- The "crown" of each tulip is created by double chain loops with slip stitches that add detail at the top.
- The pattern allows customization by increasing rounds to adjust coaster size.
- Ends should be woven in neatly for a clean finish.
Overview: How This Coaster Is Made
- Begin with a magic ring and work in rounds of increasing double crochets to form the coaster base.
- Create leaf-shaped V-stitches with green yarn as a decorative border.
- Work tulip flowers in the V-stitch gaps using six double crochets topped with popcorn stitches and crowning chains/slip stitches in a contrasting color.
- Finish by weaving in all ends and blocking coaster if desired.
Skill Level
Suitable for beginner to intermediate crocheters familiar with:
- Magic ring method
- Basic double crochet (dc) stitches
- Increases
- Popcorn stitch
- Slip stitch
- Working in rounds
Finished Dimensions
- Diameter approximately 15 cm (6 inches) with four rounds before border and tulip decoration.
- Size may vary with yarn weight and hook size.
Required Materials
| Item | Specification |
|---|---|
| Yarn | Three-ply yarn; 2 colors (base and tulip border) |
| Crochet Hook | 3 mm (US D/3 or equivalent), matching yarn weight |
| Tapestry Needle | Large eye for weaving ends |
| Scissors | For cutting yarn |
| Stitch Marker (optional) | For marking beginning of rounds |
Gauge Information
- Gauge approximated as not critical for small coaster project.
- Sample gauge: 22 stitches and 26 rows over 10 cm in single crochet.
- Adjust hook size as needed for personal tension.
Stitch Abbreviations (US Terms)
- ch = chain
- dc = double crochet
- sl st = slip stitch
- st(s) = stitch(es)
- popcorn stitch = see Special Stitches
- rep = repeat
Explanation of Special Stitches
- Magic Ring (Magic Circle): A loop formed to begin working rounds in the round without a hole in the center. See Base of the Coaster instructions.
- Popcorn Stitch: A cluster of six dc stitches worked into one stitch or space, joined at the top by pulling the yarn through the first dc to create a raised bobble effect.
- V-Stitch: A pair of dc stitches worked into the same stitch, separated by chains (dc, ch 2, dc) forming a V shape used in the leaf border.
Detailed Crochet Instructions
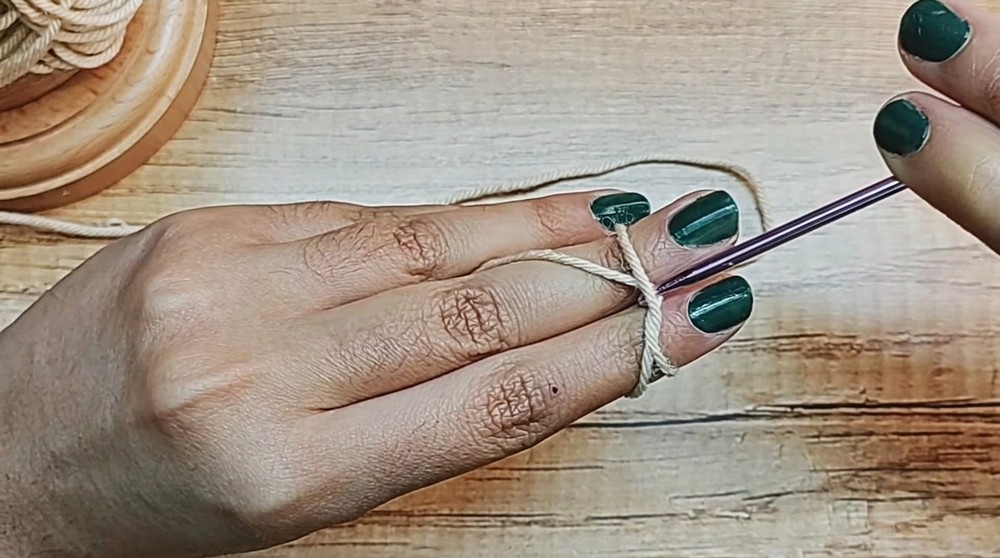
Part 1: Base Formation - Magic Ring and Round 1
- Make a Magic Ring as follows: Wrap yarn around two fingers, cross the yarn ends at back to create an "X". Insert hook under one yarn strand and catch the other, pull up a loop to form a loop on your hook. Hold loop and pull yarn attached to ball to tighten ring.
- Chain 2 (does not count as a stitch).
- Work 12 double crochets (dc) inside the magic ring evenly spaced.
- Pull the yarn tail to close the ring tightly.
- Join round with a slip stitch (sl st) in the top of the first dc to close.
Note: Beginners may mark the first stitch to track rounds.
Part 2: Round 2 - Increasing
- Chain 2 (not counted as stitch).
- Work 2 dc in each stitch around (increasing each stitch), resulting in 24 dc total.
- Join with sl st to top of first dc.
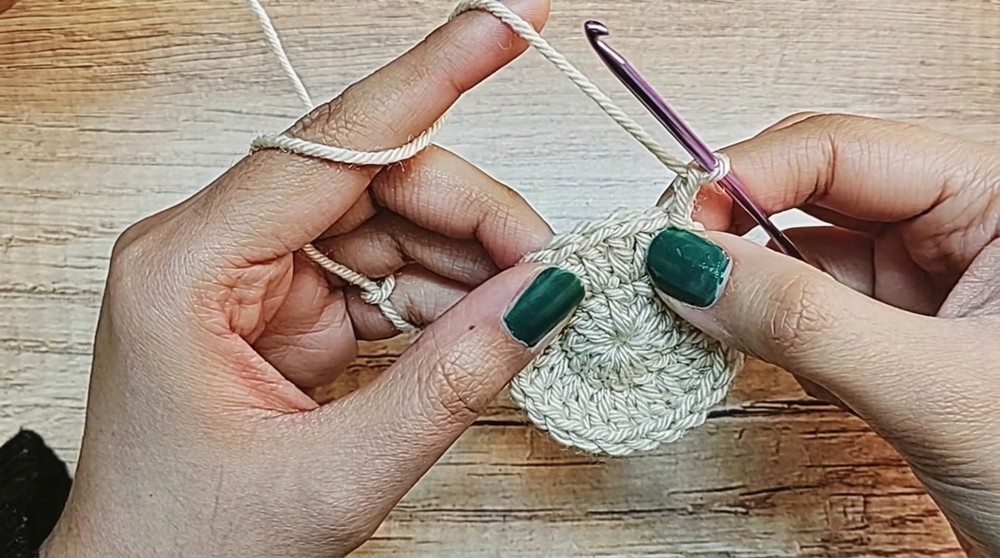
Part 3: Round 3 - Continuing Increase
- Chain 2 (no count).
- 1 dc in first stitch, then 2 dc in the next stitch (increase).
- Rep across round alternating 1 dc and 2 dc in next stitch.
- Total 36 stitches.
- Join with sl st.
Part 4: Round 4 - Increasing with Pattern
- Chain 2 (not counted).
- 1 dc in each of next 2 stitches, then 2 dc in next stitch (increase).
- Repeat throughout for 48 dc total.
- Join with sl st.
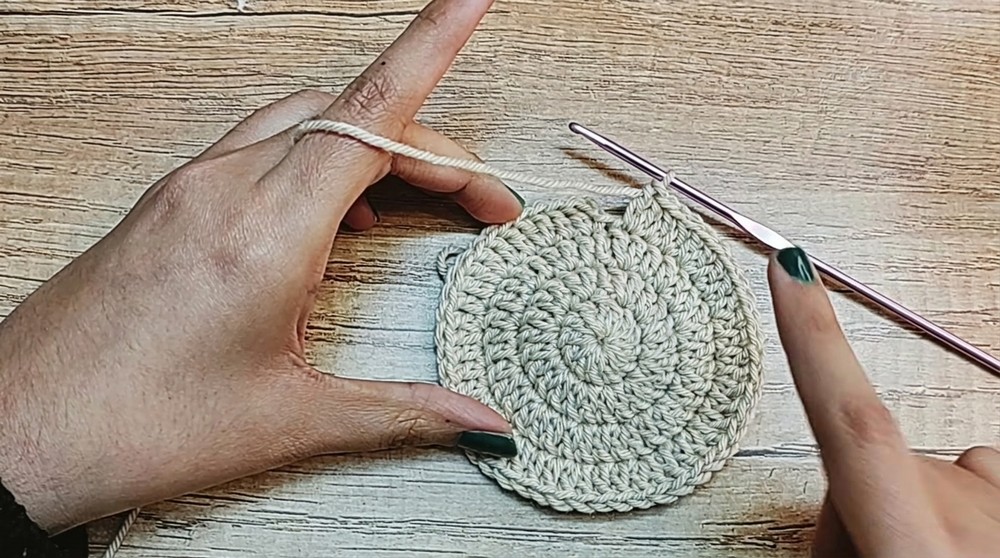
Adjust final diameter by continuing increases accordingly if desired.
Part 5: Finishing Base Round and Weaving Ends
- Optional further rounds can be made by increasing counts as per pattern: e.g., 3 dc then increase, then 4 dc then increase, etc.
- Finish round with sl st join and chain 1.
- Cut yarn leaving tail to weave in.
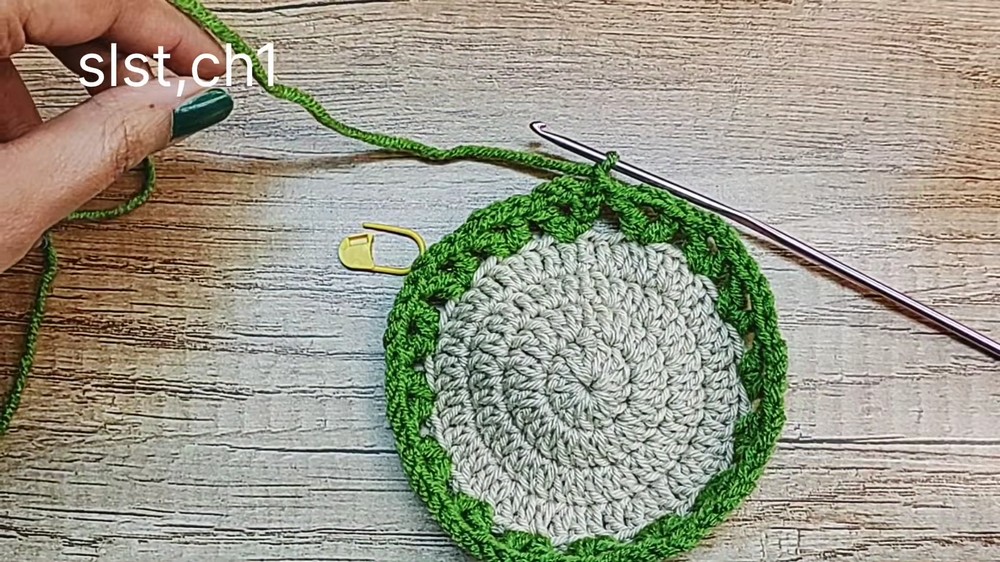
Part 6: Adding Leaf Border in Green Yarn
- Attach green yarn to any stitch.
- Chain 3 (counts as first dc).
- Chain 2 (separation chains).
- Make a dc in the same stitch (forming V stitch).
- Skip 2 stitches, next stitch: (dc, ch 2, dc) V stitch.
- Repeat around for border.
- Join with sl st to top of beginning chain 3.
- Chain 1 and fasten off leaving a tail.
Part 7: Tulip Flowers in Border V Spaces
- Using tulip color yarn, attach yarn to any V stitch's chain space.
- Chain 3 (counts as first dc).
- Make 5 more dc in the same V stitch space for a total of 6 dc.
- Work a popcorn stitch: remove hook from last dc loop, insert hook into first dc of the 6, pick up dropped loop, and pull through first dc to close popcorn.
- Optional: For a crowning effect, chain 2, slip stitch into space between tulip stitches; repeat once more (chain 2, slip stitch in same space).
- Chain 2, single crochet in space between tulip and next V stitch.
- Chain 2 and repeat tulip flower in next V stitch space.
- Continue around until all V spaces have tulips.
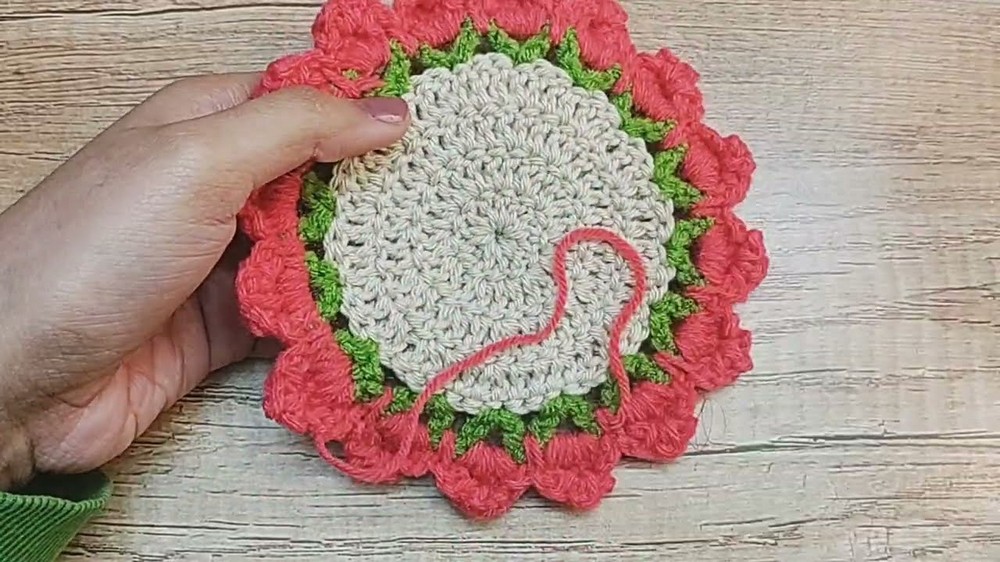
Part 8: Final Round and Closure
- After last tulip, chain 2 and single crochet in last space.
- Slip stitch into top of initial chain 3 to close round.
- Chain 1 and fasten off.
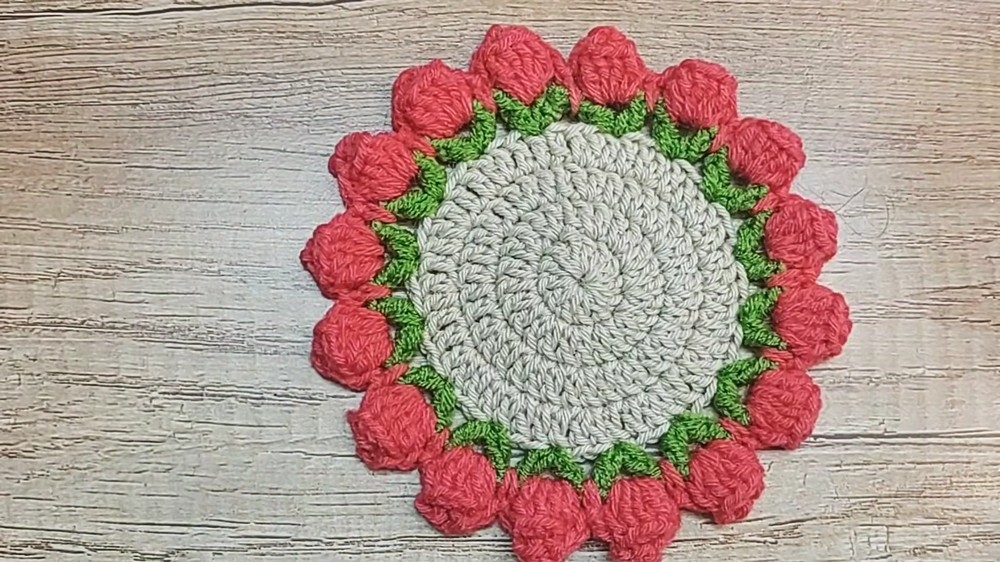
Easy-To-Follow Summary for Beginners
You start by crocheting a small ring that expands with increasing double crochets to make a flat circle-this is your coaster's base. Then, you create delicate leaf-shaped V stitches in green yarn around the coaster's edge. Into these V-shaped spaces, you crochet small tulip flowers with six double crochets worked together forming a bobble (popcorn stitch) topped with extra chains and slip stitches for detail. Finishing with neat joins and weaving in ends, your tulip coaster is ready for mugs or gifting!
Assembly and Tail Weaving
- Weave all loose yarn ends into the back of the coaster using a tapestry needle.
- Trim excess yarn neatly after weaving to prevent unraveling.
- Optionally, block the coaster lightly by pinning and steaming to flatten and smooth the stitches.
Troubleshooting Common Issues
- Hole in center of magic ring too large? Pull the yarn tail tighter to close the center snugly.
- Uneven coaster edges? Count stitches carefully to ensure increases are consistent each round.
- Popcorn stitch does not "pop"? Ensure to follow step of pulling loop through first dc of group to close well.
- Tulip looks flat? Add the crowning chains and slip stitches for extra dimension.
- Yarn tangles or frays? Use shorter yarn lengths on needle and wrap gently but firmly.
Extra Project Ideas Using This Design Technique
- Matching mug sleeves with tulip accents for gift sets
- Larger round placemats using extended rounds with the same pattern
- Embellishments on cushion covers or decorative throws
- Floral coasters with different flowers modeled on same popcorn stitch technique
- Small decorative wall hangings or doilies